Monday, December 13, 2010

Happy Holidays!

Hello Everyone!  I love Christmas!  The only other holiday that comes close the the fun factor is Halloween. Thanksgiving is my family favorite and I look forward to this time of year for all the fun and good times spent with friends and family.

I have been crafting and creating and am so excited about the things that I have finished.  Last year I made Coco mugs for coworkers and this year, I am making mini albums.  The minis that I am making are the 1 page wandering minis that are quick to put together and look wonderful.  I have spent time decorating the cover and am leaving the insides plain so that they will have the opportunity to decorate them as they see fit. 

Here they are a few of them that I have completed so far.  I have a few more to make.  Luckily, I can make 2 or 3 in an evening. because the insides are blank and I use my Cricut to cut the tags for the inside of the minis!


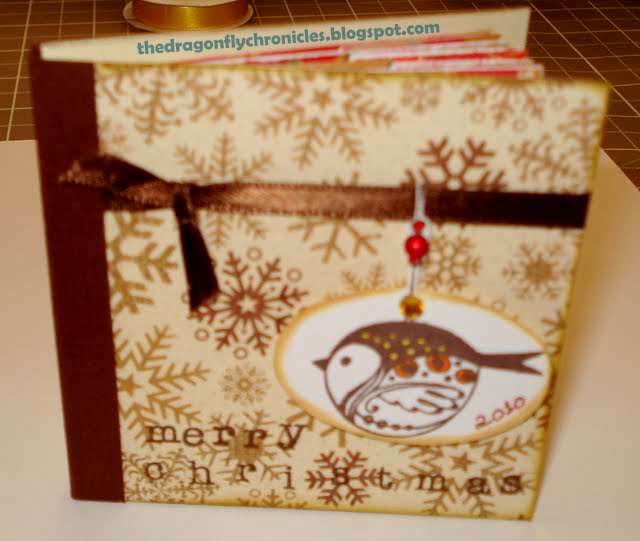
I used DCWV paper from last years Holiday Collection and this years Christmas Combo 8x8 pack. What nice paper!  There are a few more but you get the idea, and the idea behind each is much the same.  I am going to make one of the little Pizza boxes that Mary from CardzTv  demo'd to pack them in. It will be nice to  have a small box to match the albums paper or color scheme. 


Months ago,. I was watching videos on Youtube and saw a memo board made on a Cookie Sheet done by Northrose42.  I was so very inspired by this that I had to 1 - buy the Create a Critter cartridge and 2 - make a board for myself.  

I was at Joann's and I love their Clearance Section... and was very happy to find some of the nicest paper I have ever seen.  It's by K& Company designed by Tim Coffey called Tuscan Sunflowers.  BEAUTIFUL Paper!  Anyway, that is what I used for my memo board and I have a sunflower boarder in my craft room!


 I also used cork paper from Karen Foster Design, that I cut in half and then trimmed both halves to fit the bottom of the pan. I stacked them so that they would be better able to handle tacks when I need to put something on it.  (the cork paper comes with an adhesive on the back... how hand is that!)

For Birthdays I used a stamp that I bought from AC Moore and don't remember the maker... but its a nice stamp with the months listed around the stamp and you can circle the month that you are using. I stamped 6 blank index cards on the front and back so that I can turn it over once the 6 moths are over and use them again.  
 
I have to say that I had some sheet magnetic material available and used it for some of the elements but it was not strong enough to work well through the paper, but store bough magnets worked well.

The clips on top are book binder clips and I will use them to hang the pan I might have to get larger ones but these seem to work for now. 

I will post again soon, as I have more projects to share...  Hope to "see" you again soon!


Sunday, November 28, 2010

Christmas Cards Part 2

Hi Everyone!  

Here is the second batch of cards I have made for this Christmas Season.  Some are really simple and quick to make and 2 will need a Cricut to create.  I made Snowmen from the Joy of the Season cartridge.  One of the things I really love about the Expression is that you can use that fill the page option or if you know how many exactly you need use the Quantity Option!  I wanted to make 12 Snowmen and was able to just enter 12 and the size I wanted to have the snowmen and I was ready to go.  Very nice!

Card 1 - 3 Snowmen


3 snowmen cut 4 inches.  I did color in the eyes with black marker, the pieces that were cut with my circut were just TOOO small!  The ribbon behind is a wired velvet ribbon sold on a large spool.  It is a really nice ruby red that you really can't see well in the picture.

Card 2 - Poinsettia 


Quick and easy!  this card has a pre-made Poinsettia with a little bell and wired ribbon (I ran into a good sale at a local surplus store) and connected the ribbon to the green paper and adhered it to the card base.  


Card 3 - JOY


Ok.. I really cheated here.. I was going through my scrap pile and found 3 green squares that were left over from another project... I had stickers from a paper pack... and there you have it a card!  Instead of using Sticles on the squares, I used the Quickie Glue Pen by Sakura to draw my Faux Stitches and then glitter for a bit of bling on the card. The background layer is from DCWV as were the stickers. 


Card 4 - Gatefold Snowman


Another quick card, a simple gate fold with a band across that has DCWV paper from their Christmas stack from last year cut to show only the wording, my Snowman from Joy of the Season and Green cardstock from AC Moore.  I drew on the snowflakes with a red and purple glitter pen.

Thanks for stopping by. Please Leave A Comment!

Friday, November 26, 2010

Christmas Cards

Hi everyone!  Today the day after Thanksgiving I have taken a moment from the craziness of Black Friday to post a few cards that I have made lately.  I was going to make cards using mostly Cricut cuts, but it turns out the cards that I found myself making only used one cut from the Christmas Noel cartridge and the rest were based on paper, and ribbon and things cut from stencils.


I really enjoyed working on these cards, it became a challenge to make as many cards using 8x8 or 12x12 sheets of paper and digging out the punches from the drawer and put them to use.


OH... speaking of punches I used the Martha Stewart branch punch to make the wreath on one of the cards and found that the punch was a bit stiff.  It was not working the way I expect a MS punch to work.  Oiling a punch is not a good idea, as you will be wasting several punches and much time trying to get the oil off the metal to avoid the oil on your good card stock.  What to do... I tried the wax paper technique, that worked for a bit but then the punch  quickly began to get hard to punch again.
After much Winnie the Pooh type thinking... I came up with a plan... 


I took a sheet of computer paper and sprayed WD-40 LIGHTLY on the paper.  I then punched and punched until the punch was easy to use again.  This worked great.  Once it was easy to punch again, I got a clean piece of paper and punched 3 times and saw no oil!  YEAH, it worked and the punch is as good as new!


Okay.. on to the cards. I will be posting 3 cards today as I am running out to yet another store in a few moments... Tomorrow I will post another batch!


Card 1 - Joy Banner


This is a standard A2 card that I inked around the edges with Vintage Photo, the banners are triangles cut from Bazzill card stock and the background paper is from DCWV.  I used an EK Success punch to make the  banner trim and the pompoms are trim that I got at Joann's a long time ago!  Buttons  are attached with Fabri-Tac (this is great stuff!)


Card 2 - Noel Glitter

This is a very basic card.  I loved how quickly it went together and will be making more for the folks at work. This again is an A2 card with red and green card stock.  The ornaments were cut from an old stencil and mounted with foam tape. Stickles was used on all the ornaments and NOEL was written with it as well. Faux stitches were placed on top and below the green card strip.  

Card 3 - Wreath Christmas
And now for my favorite card!  I made the wreath and used paper from the DCWV Christmas pack on black  cardstock with white cardstock as the first layer. This card is just larger than an A2 card measuring 5 3/4" x 4 1/4" (just a bit larger). I decorated the wreath with Stickles to make it look like it was lit, very nice effect.  Merry Christmas was stamped with Versa Mark and black embossing powder.  The punched strip on the side is a Fiskars punch (Sorry I don't know the name of it).

So there are my three cards.  More tomorrow... Gotta run, I know there is a sale somewhere calling my name!

Thanks for stopping by!

Thursday, November 11, 2010

CardZ Size Information

Hi Everyone!  
I am going to start a Christmas Card Series and wanted to be sure that when I say "This is an A2 size card" you and I would know what I was taking about!

Below is a chart that will give you both Card and Envelope sizes:

Card Size                                          Envelope Size
A2 = 4.25 x 5.50                              4.275 x 5.75
A6 = 4.625 x 6.1875                        4.75 x 6.5
A7 = 5x7                                          5.25 x 7.25
A8 = 5.25 x 7.875                            5.50 x 8.125

Now that we have the measurements for the various card sizes, I think I will be mostly using the A2 and A7 card sizes.. they are easiest to cut and to make envelopes for is you don't have a ready made one available.


I also bought the Cricut Christmas Card Cartridge and will be making all the cards on that cartridge.  Some of them are just lovely... (ok, they are all really nice.)


I will be making videos showing how to make many of the cards and also the method for making envelopes that I really like and use all the time.


So, I am going to get busy in the scrap room and will be chatting with you all soon!


Thanks for stopping by!

Tuesday, October 26, 2010

Let's Hang Out!

Hi all ... Taking a break from all the Halloween happenings and was thinking of a friend that I haven't seen in a while and thought I would send a card to set up a date to get together. This is a standard A2 size card and the little monkey was cut from the Create A Critter Cartridge. He is double sided, so when making him I cut one base, 2 layer 1's and 2 layer 2's. His is "hanging" from a thread that is strung through a 1/16" hole that is on the fold 1/4" from the cut edge. The cut out space for the monkey is 2" x 2 3/4" I didn't do it with this card, but if, ok.. when I make it again I will repeat the pattern paper on the back of the card, to complete the look of a window.


The Let's Hang Out! was written by me. I like to hand write on my cards when possible. It adds just a extra touch of me to the card.

Thanks for stopping by!

Sunday, October 24, 2010

Cricut Cake Mini Demonstration

Cricut has done it again... They are introducing a new machine. The Cricut Cake Mini! Its a Cricut Cake the same size as the Create with all the "advanced" features on the create. Amazing!


Monday, October 4, 2010

It's in the SIGN

Sometimes I just step back and look at my scrap room and think 1-I really need to reorganize things to be able to find things easier and 2- I have so much stuff that I really need to reconsider the next time I think to buy paper or embellies. 3- I need something for the walls!.... Well 2 out of 3 ain't bad!

So I have decided to sort out a few drawers and to make things a bit easier for me.  And then I sat down after running across a few things that I forgot I had and decided to make a sign.  I love the "Live, Love, Laugh" signs that I see in stores and on cards... and decided to make something for my wall.  (somewhere in between all of this I did go to AC Moore, they were having a 40% off sale on paper!)


I used Pagoda for the symbols and MTC to make the words. I really thought this was nice but knew it needed something more.  I used a black gel pen to outline everything, and some Prima flowers and some trim with jewels on it.  I punched holes using my Crop a Dile and strung orange and black ribbon to hang it with. All very nice!


Ahhh... so nice, and now I have something inspirational for my scrap room wall.

I am a member of SOC - there is a badge on the right, if you would like to check it out... Anyway, I am hosting the October Cricut Challenges and my first challenge to the group is to create a tag.  Now I am not talking about your ordinary tag. I challenged folks to use their Cricuts to cut out the tag and use the FIT TO PAGE option! The tag has to be a fall theme and have the word FALL or AUTUMN on it.  So, as the hostess of the challenge I posted the following tag.


I used the window from the Christmas Noel cartridge with the fit to page feature and for "glass" I used acetate I got from a package.  My tree, and lamp post are from Graphically Speaking, and the pumpkins and leaves are from Doodlecharms. The small branches are from a Martha Stewart punch, and the sign on the lamp post are 2 circles layered with leaves and branches.  I plan on making one of these window tags for each season!

Sunday, September 26, 2010

Halloween Greetings and Mini Haul.wmv

Hi Everyone! I wanted to make a card for a good friend of mine who LOVES shoes, and thought I would share the making with you. I like cards with lots of color and a little bling, and this card has it all!

Heres the video:


Leave a comment, Post a link ... Talk to you soon...

Thursday, September 23, 2010

Never Ending Card Tutorial

Hi Everyone! After many false starts here is the tutorial for the Never Ending Card. I hope you can follow along. I did not mention in one section that you MUST have your BOTTOM 2 pieces of cardstock going in one direction and the TOP 2 pieces going in the OTHER. This is very important and I am sorry I didn't say that in the video, although there is an annotation that will tell you.

Here's the video:


If you make a Never Ending Card, post a link below. I would love to see your cards!

Thanks for stopping by!

Wednesday, September 22, 2010

I've Taken the Plunge

I have been thinking about doing a video for the longest time. I have been so worried about how I sound ... lighting... and what ever you can think of I worried about it.

But I spoke with Yoliebean and she told me to not worry and to just go ahead and do it. Thanks Yolie for the encouragement!

So, here it is... My first video and my first Never Ending Card. Wow.. Let me tell you ... for a card bas that is more than easy to put together this card take a lot of thought and time getting your papers and embellies together..

Here is the video:


Please leave a comment and let me know what you think. Better yet, if you have made a Never Ending Card post a link below so we all can see your creations!

Have a great day!

Sunday, September 19, 2010

Quick Card...

I wanted to make a card for a friend that I hadn't spoken to in a while and I didn't have much time to devote to a complicated card... so I got out my favorite tree stamp, a Martha Stewart border punch and a ready made card (more on that in a minute) and the result is the card below. Instead of leaves stamped or drawn I used Stickles to represent the changing leaves. I like the effect!


Ok.. now on to ready made cards... I was in Big Lots and found a package of cards with envelopes 20 cards to a package for a DOLLAR! Yes, a one dollar bill! Alright... so by the time I was through it was more than a dollar because I couldn't just buy one pack. Now I have them in white, off white, tans/browns and one pastel pack. I am all set unless I need a larger card base! Thanks Big Lots!
Posted by Picasa

Saturday, September 18, 2010

How to use CricutSearch.com


Hello everyone! Hope you are enjoying the beginning of fall. The weather here in Maine is getting crisp and more fall like every day!

Have you visited Cricutsearch.com? I love this site. It is another one that I highly recommend. If you own more than 1 or 2 cartridges and you really want a cut of a peace sign are you going to sit around and look through all of them? NO... you're going to Cricutsearch.com and enter your search and it will bring back images of the cuts from the handbooks from all the cartridges that have peace signs!

No more hunting. Just a quick search and you are on your way! Below is a video from the great folks at Cricutsearch.com explaining in much better detail how to use their search tool.


I hope you like this, I can't believe how excited I am about it... Let me know what you think, Leave a comment below!

Friday, September 17, 2010

SOC Friday Night Challenge


I love a good challenge, and this sketch challenge was a good one! I love to sketch and working with this one was easy. I saw it and knew what I wanted to do. An empty cage with the words Miss you... kind of tugs at the heart strings huh?
Posted by Picasa

Saturday, September 11, 2010

Sandi Genovese is on the Web!

This Week’s Episode – September 9, 2010


Hi Scrappers! I have great news. Sandi Genovese from "Scrapbooking" on the DIY network is now doing web based shows! I am so excited. I have enjoyed Sandi for years and have learned so much from her.

I first became aware of her when she did guest segments on the Carol Duvall Show. I remember being completely jealous because she always had the neatest toys ... I can recall thinking there was no way I would ever be able to afford a die cutting machine like she used. (I think it was s spellbinder!)

Now I own a Cricut and a Cuttlebug and cut things out all the time! How time does fly and things change. Check out Sandi's Webipsodes at the link above. You can also download them onto your Ipod and Ipad and watch them while you have down time or waiting in line... and the episodes are free on Itunes!

OH, just a little FYI, I have just completed a really cute Vacation Mini and will post a VIDEO! Yup, I got a great deal on a camera and am going to give putting little videos on the blog a try. Sigh... I am not ready for my close up!!!!

And another thing, I hosted a Cricut Image Swap on Scraps of Color (see my badge in the sidebar) and it was a great success! I will be posting pictures of the wonderful cuts that we have swapped this weekend!

So until them...

Wednesday, September 8, 2010

Evernote... A Bloggers Best Friend

Hi, a bit of a departure for me, but today I am going to recommend a website, program, app/life saver! And the best part is that for the basic option of this application its FREE!  Yup, something this wonderful is FREE!


Its called Evernote. It it located at www.evernote.com. Let me tell you, you will want to run not walk and get this on your Computer, Smart Phone, Ipad, Ipod touch...


Why?  Because when you are a blogger and you surf as much as I do you find great things and then you either do one of 2 things.  You save the bookmark and try to remember which of the 200 bookmarks has that cute card that you wanted to talk about because you made one like it and want to give credit to the originator... Or you want to put a link to that site in your blog because there is too much information to repeat on your blog.  EVERNOTE to the rescue!  You can save a note on the web with the information, a clip of the page itself, or just the address of the blog with a description you write to jog your memory.


I am also teaching classes at AC Moore and need to know what I am doing for each class and what materials the students will need and exactly what I am teaching each class. EVERNOTE to the rescue.  I have a folder or notebook for AC MOORE and list each class and what I am teaching etc.. Now when I go to the store and talk to Kim about the classes... I can call up my notebook via my smartphone and not have to depend on my memory! This has saved me a ton of times!


School...  I can't even begin to tell you how useful this is. Assignments, notes (mine and fellow students) Each class has a notebook... 


Christmas... shopping just got wonderfully easy! Each person has a page in the Christmas Notebook... Ideas found on the web, pictures of items that you saw in the store with notes re: cost, size, color, store name... all helpful to make shopping easier.. 


Ok.. I think you get the message... its great and I am sure you will enjoy it and depend on it like I do... 

Tuesday, August 31, 2010

My Perpetual Calendar

Hi, I love small desk calendars, but hate buying one every year.  I love my Cricut, and got some coasters from a local restaurant and thought, I can do this!  So with the help of stuff from my stash, and my Storybook cartridge I made this sweet little Calendar!

For the recipe ... I used 2 4x4 inch coasters that I covered with paper from DCWV  "Flower Power Spring Pack", what pretty paper! The letters and numbers were all cut using the Storybook cartridge.  Each month is done in a different color, to reflect the month.  The letters are cut in black to help me see them quickly!
The binding was done with my Bind It All and the wire is 3/4 inch white. Decorations... I hit the stash and found flowers, bling, jewels and used some Stickles... because everything is better with Stickles!


Here's a shot from the side. I have seen online may calendars with 2 more sets of Owires to act as a base... but I like this.  I used ribbon that was 2 1/2 inches and attached with some of the best glue around Its called Fabri-Tac.  It stands without problems and is very quick drying.

I am currently working on a mini vacation album... when I get a little further on with it I will post pictures!

Hope you are staying cool.. It is hotter than hot here!  Type soon!!!

Sunday, August 29, 2010

Coffin Treat Box and more creative crafts projects, templates, tips, clip-art, patterns, and ideas on marthastewart.com

Coffin Treat Box and more creative crafts projects, templates, tips, clip-art, patterns, and ideas on marthastewart.co


I love Martha Stewart and think that she and her design team come up with some really amazing stuff. This time, it's something just in time for you to start crafting before Halloween gets here!

If you didn't get the Happy Hauntings Cricut Cartridge this is just for you! Its a Halloween Coffin Treat Box. On her site you can watch a video on how to put it together and a template for you to download with instructions. To quote Martha, "I'ts a Good Thing"

Saturday, August 21, 2010

Cards, Cards, Cards

I metioned before that I have been busy creating cards and here are a few more of the cards that I've been working on. This first card is a Triple Tier Card that I found on line. I don't remember the site address, but the idea is not my original one. I did enjoy making this one and it is a quick card to make ... when you push the top 2 tiers inside the card it fits well into an A2 envelope!


I love this card! It's a combination of a slider card and an easile card. 3 basic pieces and your done. Its a nice card that when made into larger format can house a picture when you slide the pull tab up.
I have seen this card demonstrated several times on Youtube and thougt I don't know... I don't think I could do that.. but one day I wanted something for my desk that would remind me of my dogs. I decided to give this a try and here we are! and you know what??? Its not hard to do at all and was quick. The problem with my card? I hand cut the images from card stock and that took a long time!

Ahhh... You know on some of the cricut cartridges that are trees and such that you can make "3D" by slicing up the center to the middle of the image and then doing the same on the second piece and connecting them to create the tree or whatever? Well this is what I did with the card. It can be decorated on 4 sides and stand on its own.


Ok, let me know what you think! I love comments and ideas. So post a comment, I read every one!
Posted by Picasa

Friday, August 20, 2010

AC Moore Midnight Madness in the evening!

Check out the link above for a great coupon for 25% off you regular priced items at AC Moore on Sunday from 6-9pm!

Not quite Midnight but savings is savings!

Thursday, August 19, 2010

Amazon.com: Cuttlebug Machine for Die-Cutting and Embossing with Bonus Tool Kit: Kitchen & Dining

Amazon.com: Cuttlebug Machine for Die-Cutting and Embossing with Bonus Tool Kit: Kitchen & Dining

Wow... what a great price for this bundle. It comes with a paper trimmer and scissor set. It's only 39.99 and because of Amazon's shipping policy it ships FREE! Yes, that's right Free 2 day shipping. This is a great deal. Oh... Its the very pretty Blue! Not the original green Cuttlebug.

So check out the above link and save a bunch!

Monday, August 16, 2010

Great Deals at AC Moore

Hi! Just checked out AC Moore's flyer for this week and noticed that they are having a great special on Rubber Stamps. Wood and Clear BOGO FREE... Yup... Buy one get one free.. that is awesome. There are some sets that I would love to have and I just got my 2 yes thats right 2 10.00 coupons from AC Moore so I am 20.00 ahead of the game! YooHoo!!!!! See you there!!!


And for those of you that like to shop with coupons, this weeks AC Moore coupons for you to print out!

Wednesday, August 11, 2010

Show Products - CreateAndCraft

Show Products - CreateAndCraft

Have any of you been to this site? Its a site for a shopping channel in England. Why would you watch it you ask... Because, they do really good DEMOS! Yes, step by step demos of the products and techniques that are needed to create the cards, layouts and other goodies at home.

Now you can buy from them here in the States.. but the shipping will make it almost impossible... but hey...Its worth taking a peak just to see a few good demos..

OH and did I mention that this shopping channel is all about Crafting? No, ooops.. sorry ... it is and that is the hook for me that keeps me going back to see what they are doing next!

Card and scrapbook crafting over there is a bit different than here and its nice to see what people from "away" (that's a Maine term) are doing!

Friday, August 6, 2010

Cricut Saturday

What?  How long has it been?  I don't know and I don't want to think about it. I am just moving on!!!


Its Saturday and I have been busy over the past few months, (I know, I wasn't going to mention time.. but hey it happens).  I have been ill... had surgery... have gotten better and have been scrapping and card making.  


I have so many projects to share with you but I will start with the 2 latests and work my way backwards with a sprinkle of new projects as I go along until I'm caught up. 


A while back (there goes that time thing again!) I posted about sketches for layouts. Well my focus has changed a bit since then and I am totally into cards at the moment.  I needed something to help me focus my efforts and keep my sketches in one place. So, I created my Sketch Book.


One sheet of Bo Bunny card stock (Petal Pushers- Posies) cut to 11 1/2 x 9 1/2 with the corners rounded with the 1/2" side of the Corner Chomper. Letters were cut with my Cricut using the Cuttin' Up cartridge. Letters were cut at 2 1/2".


The Insides.....


I drew three boxes that are 2.5" x 3" with maybe .5" space between them and enough room on the bottom and top for quick notes about embellies and other goodies that I would like to add to the card. Now, this paper is regular computer paper taken right from my printer. Folded in half, there are 6 sheets, I tried more but found that it didn't lay nicely when closed so I came up with the 6 sheets. 


If you're interested, I can send you a PDF of the inside sheet that you can just print out for your book. Leave a comment with your email address and I will send it out to you!


Project #2


I LOVE Splitcoaststampers.com and stop in often to see what new projects they have posted often. What a great site for inspiration!  So, one day while feeling that I needed a little inspiration I stopped in and saw this Click here  a lovely card box, and had to try it. Now, when you look at it don't be scared off by the number of steps or the amount of tools they say you need. It's not as bad as it looks and it's a full day project if you don't sit and do this alone for the day... but if you take your time the end results are more than worth it... 


There is my version made with K& Company's Designer paper. I think it only took 4 sheets of 12x12 to complete this, the cards were extra ... 

The cards were cut with A Child's Year Cartridge for the Cricut and the ladies were cut from the Forever Young Cartridge. Misc images were cut from the Storybook Cartridge as well as the word addresses on the address book. I love making things that leave you feeling like you have done good work and this was one of them!


Ok... I am going to do it.. Talk about the new Cricut machine... The Imagine. This video from Obsessedwithscrapin on Youtube is one of the best I've seen. Lots of good information and detail.


I am not sure what I think of this new rendition of the Cricut.  It is not an increase in cutting size, I was hoping to see a machine that would truly allow for actual 12x12 cutting not the 11.5x11.5 we have currently with the Cricut. 
The printing has it major advantages. You can customize your color choices for background papers and print. this is great... but I have a large format printer and can print anything I want with it for background paper and use that in my scrapbooks or cut out the papers with my Cricut. 


The one thing that I will be getting are some of the new mats when they are out. they are supposed to have better adhesive, and last longer. That would be a nice change.. Although I take good care of my mats, cleaning them often with baby wipes (the kind without oils or lotions)  and have only used 2 in the 9 months that I have had my Expression.


I am a huge tool girl.. and am usually first in line saying I WANT that or I NEED this.. but I am not feeling this with the new Imagine. Maybe as time goes on and I see what people are doing with it I might have to give in and start a Imagine account so that I can get one (I save for everything .. I don't do credit cards).. but the jury is still out on this.  There are 2 other Cricut machines that are due out this year ... so I am not going to put all my eggs into the Imagine basket just yet!


Let me know what you think of this machine... I'm interested in hearing what you think.

Sunday, March 28, 2010

Cricut Saturday

Retired Cartridges: 
Well its been really hard keeping up with the coming and goings of cartridges lately from Provo Craft. They have retired 4 cartridges over the past 2 months and one of them is a really big surprise.  Tags Bags Boxes and More has been retired!
Here is a list of all that are being retired. I am not sure when they are going to no longer going to be available, but I have a feeling from what I have read that they are no producing any more of these carts and when they are gone that will be it.  So if you want one of theses I would get on it right away!


Tags, Bags, Boxes and more
BlackLetter
Designer Calendar (this is strictly rumor, I haven't seen official word from Provo Craft that this is retiring.)
Stamped
Christmas
Street Sign
 

I think one of the reasons for the Designer Calendar to be on this list (which I found on the Cricut Message Board) is because of the new combo cartridge that  PC is offering. It contains both Christmas Noel and Designer Calender. You can get this directly from PC and they are currently offering free shipping!


And then there are the new cartridges: 


Give a Hoot
"Just Because" Cards
Preserves
Straight From the Nest (exclusive to HSN) Serenade is getting a wide release!

Robotz
Create a Critter
Nursery Rhymes
Independence Day (Seasonal) Summer Vacation (Seasonal) Summer in Paris (Seasonal) Elegant Cakes
Holiday Cakes Birthday Cakes Cake Basics (with the Cricut CakeTM machine)


Get out those credit cards and checkbooks ... These are really cute!


Cricut Tips and Tricks


Have you seen this? Its a sheet for blade settings from Cricut.  

You can get a printable copy of this from cricut.com/news. This is really handy to have. There is another guide available from AboveRubiesStudio.com  On this awesome site you will also find Megan's newest offer.. A FREE ebook, "10 Hot Trends for Scrapbooking and Card Making" This is a great book and there is a lot of good information in it. 


Best project found online: 


I love the Cricut message board. There are so many talented people there and they are always willing to share what they know. The project that I found that I want to share with you so that you can take a look is: A Wedding Cake. This is just beautiful.  I can't even tell you how lovely this is. I want to make one for a friend that is getting married, and so many others for different occasions.

I am off to do some more crafting... It is a grey day and perfect for listening to a book on my Ipod and scrapping!


Please leave a comment... I really love hearing from you!

Friday, March 26, 2010

Project Thursday

Lots going on lately, but I have made a few things that I would like to share with you.


I am loving card making lately and find it to be so much fun and something that I can complete quickly and have a wonderful sense of accomplishment. Knowing that you can start a project and complete it and deliver it to the intended person all in the same day is a good thing!


This card was made using the Serenade cartridge to cut the bird cage. The background is made using the Cuttlebug folder Birds and Swirls. The little bird house is a button that I cut the shank off of, and the chain on the birdcage I made with craft wire. I really like this card and the picture really doesn't do it justice. The actual colors are much richer.


Yappy Easter!  From the Paper Pups cartridge. the eggs are ovals from George and the basket is from Doodle Charms. This card was Fun Fun Fun to make. 


I made "It's a Boy" for a contest. I had to make a paper doll and use glitter, chalk and dress it up.  I used everything asked for and the face was drawn with Micron marker. 

I like to sketch my layouts and cards and I have to tell you, this card looks NOTHING like what I planned. The title was supposed to be a pyramid and the baby was suppose to be crawling.  But as I was working on the card I realized that it just wasn't going to work for me. So we have the card above. 

Last project for this Project Thursday... Something for my mom... 


I think this is sweet and I know my mom will love it.  I am going to put Easter grass in it and then some candy and a small gift. This basket was cut using Plantin School Book. The flowers are from a kit I bought at Big Lots.  I used Stickles on the leaves and flowers. I cut the flowers using George. Mom loves these colors and I  tried to put it all together into something that I thought she would like and would be able to put out for months!  LOL... 

Well... Its almost Cricut Saturday... I have a few things to share... so come back tomorrow!

Please leave a comment, I love to hear what you are thinking...  

Tuesday, March 16, 2010

It happened again...grrrr

I don't know why this happens... but for some reason no one was able to leave a comment on my blog. I have gone into settings and changed things around AGAIN and it should work now.  Please leave a comment if you have read previous posts and were not able to do so.

Sunday, March 14, 2010

Something New

I have been scrapping and doing some shopping and there is one thing that I have to share with you all.


Tim Holtz sells these little swivels that are used to attach charms and other things onto minis and cards and anything else that you can think of.  WELL... I was in Wal-Mart last night and found in the fishing isle little swivels that come in 3 different sizes that I saw there but I bet they come bigger than the ones that I saw. They look exactly the same!  
The thing that I like about this most is that the brass ones can be colored with Alcohol Inks and work with any project!  


 this is the swivel from Wal-Mart they are 12 in a package for less than 2.00 These do not come  with the small chain attached, but this affords you the opportunity to use whatever works best for your project!


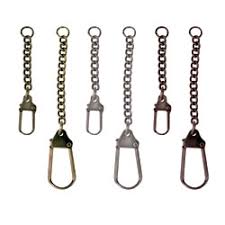
these are the swivels from T.H. and they are 3-4 dollars  plus shipping if you have to order online for 12. 


Also, There is currently a really wonderful sale on Cricut Cartridges going on at The Cricut Machine. They have full cartridges for 29.99 and other really nice items at great prices.
While I am rambling on, have you noticed that the price of the Gypsy is coming down?  I have seen it on sale at Ohmycrafts.com for 155.00 with a coupon!  That is a major savings compared to the opening day price of over 300.00 at HSN!  


Last thing for todays Something New... Have you been to your local AC Moore lately?  Mine is changing in a major positive way!  They have introduced 7gypsies products and are bringing in new Cuttlebug folders and LOTS of stuff is on clearance special. I have had a great time going through the various bins there!


See you on Project Thursday!  

Leave a COMMENT! Thanks!

Thursday, February 11, 2010

Project Thursday

I have been busy working with Valentine's Day and St. Patrick's Day coming up there is always someone that should be getting a card! A few layouts have been planned and I am going away for a little R&R this weekend so, I will be taking the camera with me to have pictures to go along with the pictures.  I will post them when finished!

Now for the cards:

Valentine's Day cards are fun and easy to do when you love the people you are giving them to. Here are a few of them ones that I have made.

Done with Heart Blocks Cuttlebug folder and a Fiskars edge punch. The hearts were covered with paint, chalk and the "be my valentine" is from the Wild Card Cricut cartridge.
This is a really small card. Measuring 3.5 x 3.0. The card is red on the outside but lined with a bright yellow. Paper punch, Hidie Grace flower, white ribbon and cuts from Wild Card Cartridge finish off this sweet little card.
I have a thought to do a series of cards based on Motown love songs. This is the first one. Stevie Wonder's "I just called to say I love you" was the idea here. Can you think of other songs?
On one of my favorite mail groups CCOTM (Cricut Cartridge of the Month) we discussed masculine Valentine's day card. This is my take on it. Wild Cart, Doodlecharms, and My Community carts were used for this and the paper is from the Safari pack from DCWV.
And my last card for this Project Thursday is a St. Patrick's Day card that I think is just too cute!  I love the paper doll cartridges and would love to have the Peach Keen Stamps for faces but that is not in my budget right now, as many of you kmow I want to get an ATG gun, so the stamps will have to wait. I found a great video on Youtube teaching you how to draw faces on dolls. So, I cut 20 faces using the blackout feature on PDDU and then watching the video again and again... until I got something I could live with I drew lots of faces.
Well, that's it for now. Please leave a comment, you know I love to hear what you think!

Saturday, February 6, 2010

Cricut Saturday!

We all use some sort of glue when using our Cricuts and I have been really considering the cost of this. So.....

Tape Cost Comparison
I have been trying to decide if I wanted to get an ATG gun. I know that so many have one and really like it and that they find it to be a suprior bonding tape, but I have been using the Ad Tech tape runner because it's local and I can just run to Wal-Mart and pick up a refill or 2 and be back home scrapping within 20 minutes.

But how many trips have I been making to Wal-Mart? So I have done a little comparison.

ATG tape refill – 3.49 for 36 yards
Ad Tech refill – 2.50 for 8.75 yards
Glue Glider Pro – 6.99 for 40 feet or 1.11 yards
Scor Tape – 4.50 for 27 yards
Terifficly Tacky Tape – 3.50 for 5 yards
JVC Tape (for ATG) 1.99 for 36 yards

Ok, now that we know how much each costs, if we base the per yard cost on 36 yards this is the break down:

Ad Tech 36 yards will cost 10.44 or almost 3 rolls of ATG tape or 108 yards of tape.
Glue Glider Pro 36 yards will cost 18.36 cents or 4 rolls of ATG tape or 144 yard of tape.
Scor Tape 36 yards will cost 6.12 or almost 2 rolls of ATG tape or 72 yards of tape.
Terifficly Tacky Tape – 36 yards will cost 25.20 or 7 rolls of ATG tape or 252 yards of tape.

Now I know we don't use TTT for more than just holding things that really need the extra stick, but sometimes I really use it a lot because I know that I need something a bit stronger than the Ad Tech glue for a larger project. So, I have convinced myself that an ATG gun is the way to go.

So, the cost of an ATG gun at www.framingsupplies.com is 41.69 plus shipping and at www.cropnstick.com it is 41.60 plus shipping. I have checked Ebay and have found that they are much more there.
There are lots of other tape runners out there but I focused on these because they are the ones that I have used and know best.

Please leave a comment, I love to hear what you're thinking! Thanks

Monday, January 18, 2010

Something New


Welcome Something New Monday!~
I have been busy over the past few days and have been thinking about a lot of things I would like to share with you. Some of it is now and some of it is just things that I have been thinking about.... 


Scraps... 
I have a ton of scraps!  What do you do with your scraps?  How do you store your scraps? I know some of you have elaborate systems to store your scraps, and others just have a nice pile of them... I just bought a expanding filing folder and store them by color. This is working so far. 
The other thing I have decided to do with my scraps is use them! I have a sketch book and have been working on layouts that will use them as well as some cards. The end results often don't look exactly like my sketch but close enough. The art of creation often leads in different directions! Below is my layout using circles cut on my Cricut using GBS. 


Ok, here is the sketch that I based the lay out on, and this is what it turned out to be.


Not quite the same but the idea is there. The use of the left over paper along with the journal tag worked out well I think.


So, circles, squares, rectangles, any shape that you can manage to cut will work out really well to use of your scraps and get you being productive!


Oh, and if you are making cards, make more than one. I thought I was the type of person that only wanted to make one of anything, but I find that if I am already making a card and have the extra paper (not using only scraps to make the card) that making at least 2 works out great. You have one to give and one in reserve to give again later.


Cuttlebug...
When I was surfing the web I found people doing wonderful things with their embossed images. One of the things that I liked the best was the coloring the raised portions with ink, chalk, even crayons! Well I tried these and lets just say that I wasn't really successful. Then I thought I would give by brayer a try. It worked out much better for me than the other methods I tried.... 

I haven't tried it with a solid color inkpad but that is coming!


Site of the week...
This week I want to share my favorite site for shopping.  Have you tried www.froogle.com? This is one of the best ways to see prices for comparisons and to find out who is selling the item you are looking for. Give it a try and let me know what you think!


New item of the week...
I wanted to get some paper for Valentine's Day. I went to my local A.C Moore (they had a great sale on my favorite paper DCWV $19.99 packs for $10.00) and I looked around and saw lots of the same things that I either had seen before or had at home... Sigh... Then I saw Libby!  Libby is the manager of the scrapbooking section, and I mentioned what I was looking for and she said that there was a new paper that wasn't put out yet and she would get it for me.  Well, when I saw it I knew I had to have it, and wanted to share with you to keep an eye out for it. You will love it too!
I couldn't resist!  Valentine's Day with a Halloween twist!  I love the skull and cross bones, The pack is called Madly in Love. Black, green, red, pink not all the colors for Valentine's Day but they are yummy together.


Well, thats it for now, I will be back on Thursday to share some of the projects I have completed.
Don't forget to leave a comment! I love Comments.